Installing a projector
Installation should be looked at before buying a projector. It can be as easy as positioning a projector on a table or bookcase and connecting to your laptop.
If you require your projector to be ceiling mounted you will need to run power and video cables or connect via your wifi. Current
projectors are designed for easy installation. Lenses can now cover a wide range, from ultra-short to long throw with optional lenses. Call and we can guide you.
You need to consider, what will connect to the projector, structural supports to mount the projector, and any obsticals between
the screen and the projector. Basic stuff.
Positioning
Most projectors give you four positioning options:
 Front - Simplest of all installations, only requires power connection and signal connection.
Image size can be adjusted by simply repositioning the projector and altering the zoom lens
(when available). This can also help in reducing the length of the video cable improving
signal quality and eliminating the cost of expensive cabling.
Front - Simplest of all installations, only requires power connection and signal connection.
Image size can be adjusted by simply repositioning the projector and altering the zoom lens
(when available). This can also help in reducing the length of the video cable improving
signal quality and eliminating the cost of expensive cabling.
 Ceiling - Fixed installation, requires image inversion, cabling for Video and power to
ceiling and a ceiling mount. Before fixing you will need to calculate the required throw distance
for your desired image size and the image offset (See Below). Please note that ceiling mounting
in hot climates can reduce the effectiveness your projectors cooling system and may lead to lamp
failure. Note: See your projector manual for instructions on inverting your image.
Ceiling - Fixed installation, requires image inversion, cabling for Video and power to
ceiling and a ceiling mount. Before fixing you will need to calculate the required throw distance
for your desired image size and the image offset (See Below). Please note that ceiling mounting
in hot climates can reduce the effectiveness your projectors cooling system and may lead to lamp
failure. Note: See your projector manual for instructions on inverting your image.
 Rear - Offers the same easy installation as front but requiring horizontal image inversion
and a rear projection screen.
Rear - Offers the same easy installation as front but requiring horizontal image inversion
and a rear projection screen.
 Rear Ceiling - Requirements are the same as both Ceiling and rear.
Off Center Distortion
Idealy you would place the projector horizontally in line with the center of the screen, level to the top or bottom of the screen.
If you need to position your projector to the left, right, above or below the screen. Your image may suffer distortion of the image
dimensions - Keystoning.
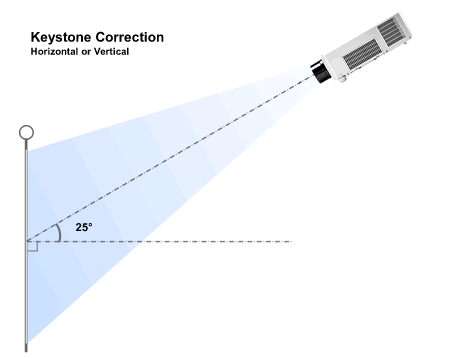
Keystone Correction
In this situation it is preferable to use Lens shift over Keystone correction. Keystone correction is also
referred to as 3D-reform and Side-shot. Most projectors don't have lens shift. Talk to sales if you need it.
- Lens shift changes the projected image inside the lens maintaining the maximum resolution of your image. more on our Lens page.
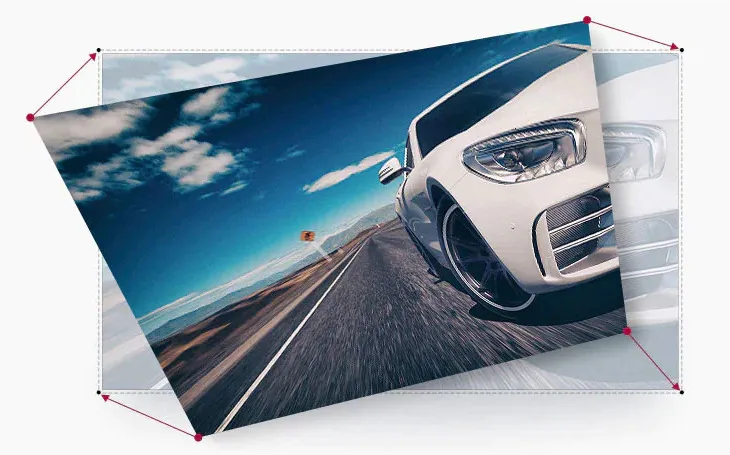
- Keystone Correction squeezes the image displayed on the projection panel (lcd or dlp etc) to counter the
projected image distortion, this reduces the number of pixels used on the panel and lowers the image resolution.
For example "A" in the above image would be corrected by reducing the left hand side of the image on
the projection panel.
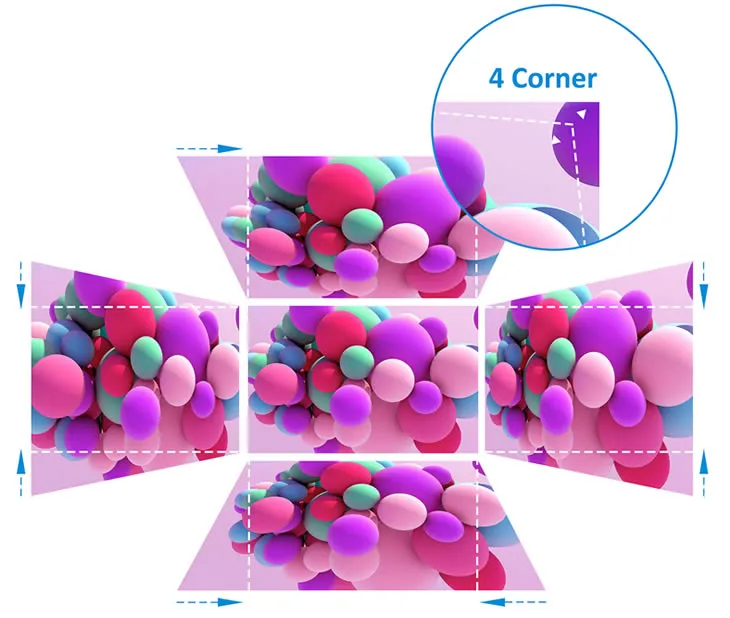
- Cornerstone is just a simple user interface, to implement keystone correction. Just drag the image corners to
your screen corners.
Most projectors have vertical Keystone Correction to correct problems "C and D" above, only some come
with Horizontal Keystone Correction which allows positioning of the projector to the left or right of the screen.
Horizontal tends to have a lower angle adjustment than vertical correction.
Cornerstone Correction
Angle of Projection
When you look at the specifications for projector, Keystone correction is normally quoted as an angle.
This is the largest angle that the projector can square the image for.
Screen size and Throw distance
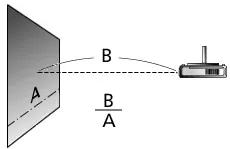 Throw Ratio is the ratio of Throw distance over Screen width. This ratio allows you to calculate the image size at any given
distance or the throw distance for any given screen size.
Throw Ratio is the ratio of Throw distance over Screen width. This ratio allows you to calculate the image size at any given
distance or the throw distance for any given screen size.
- Screen width - "A"
- Throw Distance - "B"
Image Offset
 Image Offset, quoted as a percentage, is the height of the image "H" divided by the distance that the
image is projected above the horizontal line from the lens "C".
This should be considered when calculating the position of your screen especially for ceiling mounting as it reduces
the need to use extendable ceiling brackets to lower your projector. note: projectors with Lens Shift do not
have a quoted offset)
Image Offset, quoted as a percentage, is the height of the image "H" divided by the distance that the
image is projected above the horizontal line from the lens "C".
This should be considered when calculating the position of your screen especially for ceiling mounting as it reduces
the need to use extendable ceiling brackets to lower your projector. note: projectors with Lens Shift do not
have a quoted offset)